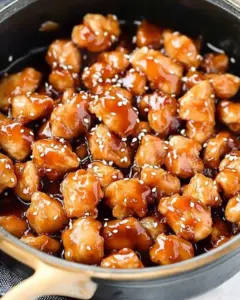
Bring restaurant-quality hibachi-style fried rice to your home with this easy recipe! This dish is perfect for any occasion, whether it’s a cozy family dinner or an impressive meal for guests. Made with fresh ingredients and simple techniques, this flavorful fried rice stands out with its rich taste and delightful texture. You’ll love how quickly it comes together—ready in just 35 minutes!

Jump to:
- Why You’ll Love This Recipe
- Tools and Preparation
- Essential Tools and Equipment
- Importance of Each Tool
- Ingredients
- For the Fried Rice
- For Garnish
- How to Make Hibachi-Style Fried Rice
- Step 1: Prepare the Rice
- The Casserole Dish Thousands of Families Can't Cook Without!
- Step 2: Make Butter-Soy Sauce
- Step 3: Scramble the Egg
- Step 4: Sauté Vegetables
- Step 5: Fry the Rice
- Step 6: Season the Rice
- Step 7: Combine and Serve
- How to Serve Hibachi-Style Fried Rice
- With Grilled Proteins
- As a Stand-Alone Dish
- In a Bowl
- How to Perfect Hibachi-Style Fried Rice
- Best Side Dishes for Hibachi-Style Fried Rice
- Common Mistakes to Avoid
- Storage & Reheating Instructions
- Refrigerator Storage
- Freezing Hibachi-Style Fried Rice
- Reheating Hibachi-Style Fried Rice
- Frequently Asked Questions
- What makes Hibachi-Style Fried Rice different?
- Can I customize my Hibachi-Style Fried Rice?
- How do I prevent my fried rice from getting mushy?
- What if I don’t have soy sauce?
- Final Thoughts
- 📖 Recipe Card
- Amazon's Best Seller Pasta Bowls Are Almost Gone!
Why You’ll Love This Recipe
- Quick and Easy: This hibachi-style fried rice takes only 35 minutes to prepare, making it a great weeknight meal.
- Flavorful and Satisfying: The combination of soy sauce, butter, and fresh vegetables creates a deliciously savory dish.
- Customizable: Feel free to add your favorite proteins or vegetables to make it your own.
- Versatile: Serve it as a side dish or as a main course; it pairs well with various proteins.
- Kid-Friendly: Even picky eaters will enjoy this tasty, colorful meal!
Tools and Preparation
To make hibachi-style fried rice, you’ll need some essential tools that help ensure the process goes smoothly.
Essential Tools and Equipment
Importance of Each Tool
- Wok: A wok allows for even heat distribution, which is ideal for stir-frying the rice perfectly.
- Spatula: A wide spatula helps in breaking apart clumps of rice while stirring without damaging the grains.
- Whisk: Use a whisk to scramble eggs quickly, ensuring they cook evenly and remain fluffy.
Ingredients
For the Fried Rice
- 4 cups cooked short-grain white rice (cold, day-old preferred)
- 1 egg, whisked and scrambled
- 1/2 cup chopped carrots (fresh or frozen)
- 1/2 cup frozen peas
- 1/2 cup white onion, diced
- 4 tablespoons unsalted butter, softened
- 2 tablespoons low-sodium soy sauce
- 2–3 tablespoons neutral oil (peanut, canola, or vegetable oil)
- 2 teaspoons sesame oil (optional)
For Garnish
- 2 tablespoons fresh parsley, finely chopped

How to Make Hibachi-Style Fried Rice
Step 1: Prepare the Rice
Cook your short-grain white rice according to package instructions. Once cooked, chill it for at least 1 hour or overnight. Day-old rice works best as it’s drier and prevents stickiness during frying.
The Casserole Dish Thousands of Families Can't Cook Without!

Step 2: Make Butter-Soy Sauce
In a small bowl, soften the butter at room temperature. Add the low-sodium soy sauce into the bowl. Mash them together using a fork until combined. It’s fine if they don’t mix completely.
Step 3: Scramble the Egg
Heat 1 tablespoon of neutral oil in your wok or skillet over medium heat. Add the whisked egg and cook until scrambled. Break the egg into small pieces using your spatula. Once cooked, remove from the skillet and set aside.
Step 4: Sauté Vegetables
Add another splash of oil to the skillet. Cook the chopped carrots, peas, and diced onion for about 4 minutes while stirring occasionally until they are tender. Season with salt and pepper before removing from heat.
Step 5: Fry the Rice
Heat another tablespoon of oil in the skillet. Add your chilled rice while breaking apart any clumps with your spatula. Stir-fry for about 4–5 minutes until warmed through and slightly browned.
Step 6: Season the Rice
Pour the butter-soy sauce mixture over the rice. Toss everything together until each grain is coated evenly with flavor. Cook until there are no visible white grains left.
Step 7: Combine and Serve
Return the scrambled egg and sautéed veggies back into the skillet. If desired, drizzle sesame oil over everything for added flavor. Stir well to combine all ingredients thoroughly. Adjust seasoning with more soy sauce if needed before serving immediately.
Enjoy your homemade hibachi-style fried rice!
How to Serve Hibachi-Style Fried Rice
Hibachi-Style Fried Rice is not just a meal; it’s an experience. You can serve this delightful dish in various ways to enhance its flavor and presentation.
With Grilled Proteins
- Chicken: Juicy grilled chicken adds a savory touch that complements the rice beautifully.
- Steak: Tender hibachi-style steak brings a rich flavor, making the meal more filling.
- Shrimp: Succulent shrimp add a seafood twist that pairs well with the soy sauce.
As a Stand-Alone Dish
- Garnished with Green Onions: A sprinkle of fresh green onions on top brightens the dish and adds a pop of color.
- With Fried Egg on Top: Placing a sunny-side-up egg over your fried rice makes for an indulgent presentation.
In a Bowl
- Bowl Meal: Serve in deep bowls and layer with additional vegetables for a colorful, nutritious option.
- Add Sriracha: Drizzle some Sriracha over the top for those who enjoy a spicy kick.
How to Perfect Hibachi-Style Fried Rice
To ensure your Hibachi-Style Fried Rice turns out perfectly every time, follow these essential tips.
- Use Day-Old Rice: Cold, day-old rice is drier and fries better than freshly cooked rice.
- High Heat Cooking: Cooking at high heat helps achieve that desirable wok hei flavor and texture.
- Don’t Overcrowd the Pan: Cook in batches if necessary to allow for even frying without steaming the rice.
- Season at Each Step: Season your eggs, veggies, and rice separately to build layers of flavor.
- Keep Ingredients Ready: Have all ingredients prepped before you start cooking to maintain a quick workflow.

Best Side Dishes for Hibachi-Style Fried Rice
Pairing side dishes with your Hibachi-Style Fried Rice can elevate your meal. Here are some great options:
- Miso Soup: A warm bowl of miso soup provides a soothing contrast to the fried rice.
- Japanese Salad: Fresh greens with sesame dressing add crunch and balance.
- Tempura Vegetables: Lightly battered and fried vegetables introduce texture and flavor diversity.
- Edamame: Steamed edamame pods are an easy, healthy snack that complements the meal well.
- Pickled Vegetables: Japanese pickles offer a tangy bite that cuts through the richness of fried rice.
- Grilled Corn on the Cob: Sweet corn enhances the overall flavor profile and adds sweetness.
Common Mistakes to Avoid
It’s easy to make mistakes when preparing Hibachi-Style Fried Rice. Here are some common pitfalls and how to avoid them.
- Using fresh rice: Freshly cooked rice is often too sticky and moist for frying. Always use day-old rice for the best texture.
- Skipping the prep: Failing to chop your vegetables and whisk the egg beforehand can slow you down during cooking. Prepare all ingredients before you start cooking.
- Overcrowding the pan: Adding too much rice or vegetables at once can lead to uneven cooking. Fry in batches if necessary to ensure even browning.
- Forgetting to season: Neglecting to add enough soy sauce or seasoning can leave your dish bland. Taste as you cook and adjust seasoning as needed.
- Not controlling the heat: Cooking on low heat can result in soggy rice. Ensure your skillet or wok is hot enough for a proper stir-fry.
Storage & Reheating Instructions
Refrigerator Storage
- Store Hibachi-Style Fried Rice in an airtight container.
- It can be kept in the fridge for up to 4 days.
Freezing Hibachi-Style Fried Rice
- Freeze in a freezer-safe container or bag, removing excess air.
- It will last up to 3 months in the freezer.
Reheating Hibachi-Style Fried Rice
- Oven: Preheat to 350°F (175°C). Spread rice on a baking sheet and cover with foil. Bake for about 15 minutes until heated through.
- Microwave: Place rice in a microwave-safe bowl, cover with a damp paper towel, and heat for 1-2 minutes, stirring halfway through.
- Stovetop: Heat a bit of oil in a skillet over medium heat. Add rice and stir for about 5-7 minutes until warmed thoroughly.

Frequently Asked Questions
What makes Hibachi-Style Fried Rice different?
Hibachi-Style Fried Rice features savory flavors from soy sauce, butter, and fresh vegetables, making it distinct from other fried rice variations.
Can I customize my Hibachi-Style Fried Rice?
Yes! You can add proteins like chicken, shrimp, or tofu, as well as any vegetables you prefer, such as bell peppers or broccoli.
How do I prevent my fried rice from getting mushy?
Use day-old rice that has been chilled; this helps keep grains separated and firm during cooking.
What if I don’t have soy sauce?
You can substitute with tamari or coconut aminos for a gluten-free option or use low-sodium soy sauce if you’re watching sodium intake.
Final Thoughts
Hibachi-Style Fried Rice is not only quick and easy but also incredibly versatile. This dish pairs wonderfully with proteins or stands alone as a satisfying meal. Feel free to customize it with your favorite ingredients for endless delicious variations!
Did You Enjoy Making This Recipe? Please rate this recipe with ⭐⭐⭐⭐⭐ or leave a comment.
📖 Recipe Card
Print
Hibachi-Style Fried Rice
- Total Time: 35 minutes
- Yield: Serves 4
Description
Bring the flavors of your favorite hibachi restaurant right into your kitchen with this easy Hibachi-Style Fried Rice recipe! In just 35 minutes, you can whip up a delightful dish that’s perfect for family dinners or entertaining guests. This savory fried rice is made with fresh ingredients like carrots, peas, and onion, all beautifully combined with soy sauce and butter for maximum flavor. It’s not only quick to prepare but also highly customizable—add your favorite proteins or veggies for a personalized touch. Whether enjoyed as a side dish or a main course, this colorful meal is sure to impress even the pickiest eaters.
Ingredients
Instructions
- Prepare the rice by cooking it according to package instructions; chill in the refrigerator for at least one hour.
- In a small bowl, mix softened butter with soy sauce until combined.
- Heat oil in a wok or skillet over medium heat and scramble the egg; set aside.
- Sauté carrots, peas, and onion until tender; season with salt and pepper.
- Add more oil to the skillet and stir-fry chilled rice until warmed through and slightly browned.
- Pour butter-soy sauce over the rice; toss to coat evenly.
- Return scrambled egg and sautéed veggies to the skillet; combine well before serving.
- Prep Time: 10 minutes
- Cook Time: 25 minutes
- Category: Main
- Method: Frying
- Cuisine: Japanese
Nutrition
- Serving Size: 1 cup (220g)
- Calories: 380
- Sugar: 3g
- Sodium: 600mg
- Fat: 14g
- Saturated Fat: 8g
- Unsaturated Fat: 6g
- Trans Fat: 0g
- Carbohydrates: 53g
- Fiber: 2g
- Protein: 8g
- Cholesterol: 120mg
Amazon's Best Seller Pasta Bowls Are Almost Gone!