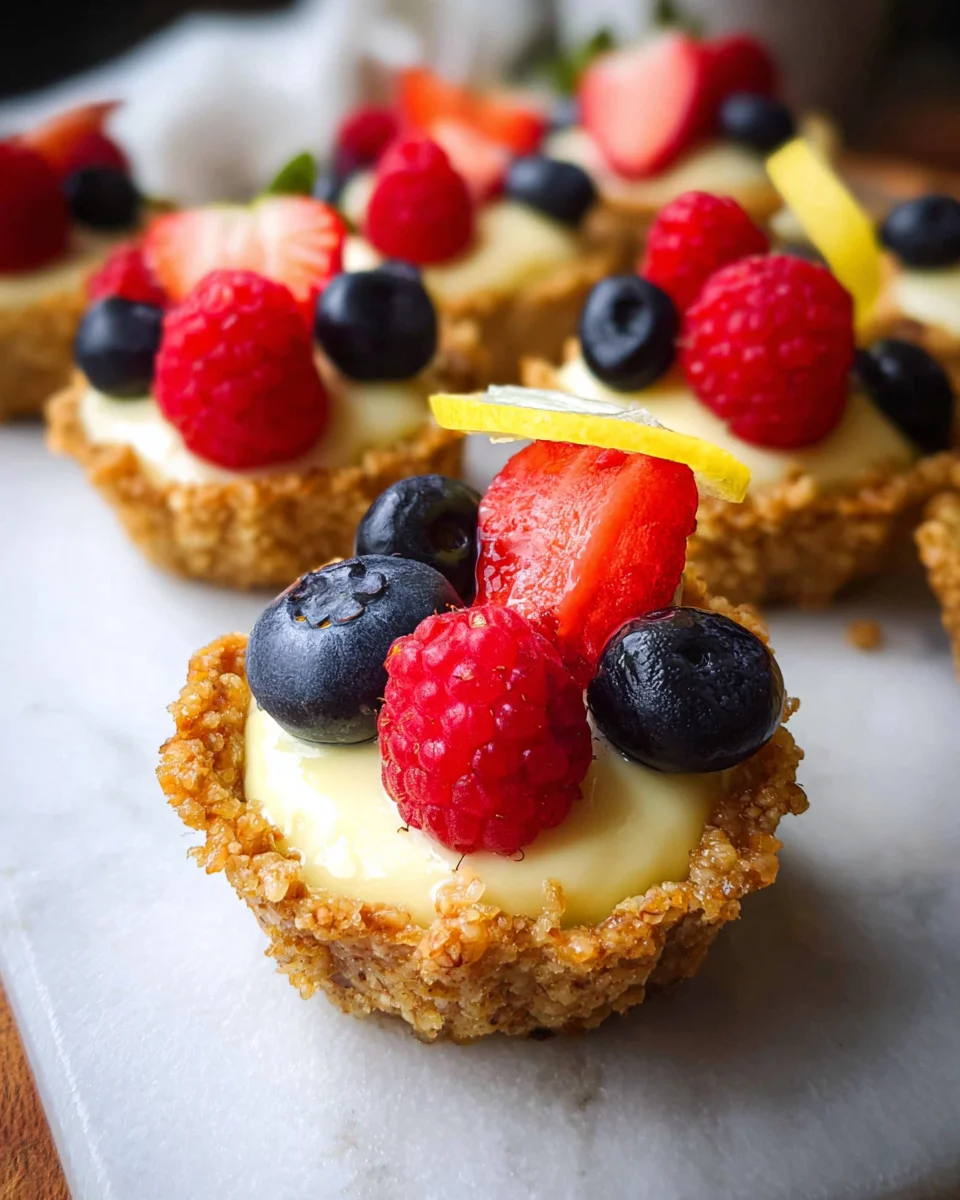
With their bright, zesty flavor and creamy texture, Mini Lemon Cheesecake Tarts are an irresistible treat perfect for any gathering. These delightful tarts are not only visually appealing but also incredibly easy to make. With no baking required, they come together quickly, making them ideal for last-minute parties or casual summer get-togethers. Plus, you can customize them with your favorite fruits for a unique twist!

Jump to:
- Why You’ll Love This Recipe
- Tools and Preparation
- Essential Tools and Equipment
- Importance of Each Tool
- Ingredients
- How to Make Mini Lemon Cheesecake Tarts
- Step 1: Prepare the Crust
- Step 2: Make the Filling
- Step 3: Assemble the Tarts
- Step 4: Garnish and Serve
- How to Serve Mini Lemon Cheesecake Tarts
- For a Summer Picnic
- As Party Favors
- At a Dessert Table
- With Coffee or Tea
- How to Perfect Mini Lemon Cheesecake Tarts
- Best Side Dishes for Mini Lemon Cheesecake Tarts
- Common Mistakes to Avoid
- Storage & Reheating Instructions
- Refrigerator Storage
- Freezing Mini Lemon Cheesecake Tarts
- Reheating Mini Lemon Cheesecake Tarts
- Frequently Asked Questions
- Can I use store-bought crusts for Mini Lemon Cheesecake Tarts?
- How do I make my Mini Lemon Cheesecake Tarts more flavorful?
- Can I substitute any ingredients?
- How long do Mini Lemon Cheesecake Tarts last?
- Final Thoughts
- 📖 Recipe Card
Why You’ll Love This Recipe
- Quick and Easy: This recipe comes together in just 20 minutes of prep time, allowing you to whip up a delicious dessert without much effort.
- No Baking Required: Enjoy the ease of a no-bake dessert that saves time and hassle, perfect for warm days when you want to avoid turning on the oven.
- Customizable Toppings: Whether you prefer fresh fruit or fruit preserves, these tarts can be topped with whatever you love, adding a personal touch.
- Perfect for Any Occasion: Mini Lemon Cheesecake Tarts are great for birthdays, picnics, or holiday celebrations; they’re sure to impress your guests!
- Light and Refreshing: A tangy lemon filling makes these tarts a refreshing choice that balances sweetness with a citrus kick.
Tools and Preparation
Before getting started on your Mini Lemon Cheesecake Tarts, gather your tools and equipment. Having everything ready will streamline the process.
Essential Tools and Equipment
- Mixing bowls
- Electric mixer
- Measuring cups and spoons
- Muffin tin or tartlet pans
- Rubber spatula
Importance of Each Tool
- Electric mixer: This tool is essential for achieving a creamy and smooth cheesecake filling without lumps.
- Muffin tin or tartlet pans: These help shape the tarts perfectly, ensuring even servings that look great on any dessert table.
Ingredients
Ingredients:
– 1 cup graham cracker crumbs ((5 ounces, or 10 crackers crushed))
– 2 tablespoons granulated sugar
– 6 tablespoons unsalted butter (melted)
– 1 8-oz package cream cheese (softened)
– 1/2 cup sugar
– 2 teaspoons lemon zest (divided)
– 2 tablespoons lemon juice (freshly squeezed)
– 1/3 cup heavy whipping cream
– 1/4 teaspoon vanilla extract
– fresh fruit or fruit preserves for garnish
How to Make Mini Lemon Cheesecake Tarts
Step 1: Prepare the Crust
- In a mixing bowl, combine the graham cracker crumbs, granulated sugar, and melted butter. Mix until well combined.
- Press the mixture firmly into the bottom of muffin tins or tartlet pans to form a crust.
Step 2: Make the Filling
- In another bowl, beat the softened cream cheese with an electric mixer until creamy.
- Gradually add in the sugar, continuing to mix until smooth.
- Stir in one teaspoon of lemon zest, lemon juice, and vanilla extract. Mix well.
- In a separate bowl, whip the heavy cream until stiff peaks form. Gently fold this into the cream cheese mixture until fully incorporated.
Step 3: Assemble the Tarts
- Spoon the cheesecake filling into each prepared crust, smoothing it out evenly.
- Refrigerate for at least two hours to allow them to set properly.
Step 4: Garnish and Serve
- Once set, remove from the refrigerator and garnish each tart with fresh fruit or fruit preserves.
- Serve chilled and enjoy your delicious Mini Lemon Cheesecake Tarts!
How to Serve Mini Lemon Cheesecake Tarts
Mini Lemon Cheesecake Tarts are delightful and versatile, making them perfect for various occasions. Here are some fun ways to serve these tasty treats.
For a Summer Picnic
- Fresh Berries: Serve with a mix of strawberries, blueberries, and raspberries for a burst of color and flavor.
- Lemonade Jars: Pair with small mason jars of refreshing lemonade for a cohesive summer theme.
As Party Favors
- Individual Boxes: Package each tart in a cute box tied with twine for guests to take home.
- Personalized Tags: Add tags with the recipe name or a sweet message for an extra touch.
At a Dessert Table
- Mixed Fruit Platter: Surround the tarts with seasonal fruits for an eye-catching display.
- Mini Dessert Cups: Include other mini desserts like chocolate mousse or panna cotta to create variety.
With Coffee or Tea
- Coffee Pairing: Serve alongside a light roast coffee to complement the tart lemon flavor.
- Herbal Tea Selection: Offer a selection of herbal teas that enhance the citrus notes, such as chamomile or mint.

How to Perfect Mini Lemon Cheesecake Tarts
To make your Mini Lemon Cheesecake Tarts absolutely perfect, consider these useful tips.
- Chill Thoroughly: Allow the tarts to chill in the fridge for at least two hours. This helps set the cheesecake filling perfectly.
- Use Fresh Ingredients: Opt for fresh lemons and high-quality cream cheese for the best flavor and texture.
- Whip Cream Properly: Ensure your heavy whipping cream is whipped to stiff peaks before folding it into the filling. This adds fluffiness.
- Garnish Creatively: Experiment with different toppings such as edible flowers, mint leaves, or colorful fruit preserves for visual appeal.
Best Side Dishes for Mini Lemon Cheesecake Tarts
When serving Mini Lemon Cheesecake Tarts, consider these delightful side dishes that complement their flavors beautifully.
- Seasonal Fruit Salad: A light mix of seasonal fruits provides freshness and balances the richness of the tarts.
- Cucumber Sandwiches: These light bites add a refreshing crunch that pairs well with dessert.
- Savory Cheese Platter: Offer a selection of cheeses like brie and goat cheese to contrast with the sweetness of the tarts.
- Caprese Skewers: Cherry tomatoes, basil, and mozzarella on skewers offer vibrant colors and flavors that brighten any table setting.
- Spinach Salad: A simple spinach salad with lemon vinaigrette ties in well with the tart’s lemon flavor while adding greens.
- Pasta Salad: A light pasta salad can provide heartiness without overwhelming guests before dessert is served.
Common Mistakes to Avoid
Making Mini Lemon Cheesecake Tarts can be a breeze, but there are some common pitfalls to watch out for.
- Skipping the Cream Cheese Softening: Using cold cream cheese makes it hard to blend smoothly. Always let it soften at room temperature for at least 30 minutes before mixing.
- Incorrect Measurements: Accurate measurements are key. Use a kitchen scale or measuring cups to ensure you get the right amounts of ingredients for the perfect texture.
- Not Chilling Long Enough: These tarts need time to set. Allow them to chill in the refrigerator for at least 2 hours, or overnight for best results.
- Overmixing the Filling: Overmixing can introduce too much air, leading to cracks. Mix just until combined and smooth for a creamy consistency.
- Ignoring Flavor Enhancements: Don’t skip the lemon zest! It adds vibrant flavor. Incorporate fresh zest for an extra zesty kick that enhances your tart’s taste.

Storage & Reheating Instructions
Refrigerator Storage
- Store any leftover tarts in an airtight container.
- They can last up to 5 days in the fridge.
Freezing Mini Lemon Cheesecake Tarts
- Freeze tarts in a single layer on a baking sheet before transferring them to a freezer-safe container.
- They can be frozen for up to 3 months.
Reheating Mini Lemon Cheesecake Tarts
- Oven: Preheat to 350°F (175°C) and heat for about 10-15 minutes until slightly warm.
- Microwave: Heat on low power for 15-20 seconds at a time until warmed through.
- Stovetop: Place in a non-stick pan over low heat, covering it with a lid until warmed.
Frequently Asked Questions
Here are some common questions about making Mini Lemon Cheesecake Tarts.
Can I use store-bought crusts for Mini Lemon Cheesecake Tarts?
Yes, store-bought crusts save time! Just make sure they fit your tart pans well.
How do I make my Mini Lemon Cheesecake Tarts more flavorful?
Add extra lemon zest or try mixing in different fruit purees into your filling for variety!
Can I substitute any ingredients?
Absolutely! You can use coconut cream instead of heavy whipping cream for a dairy-free version.
How long do Mini Lemon Cheesecake Tarts last?
They stay fresh in the fridge for up to five days and can be frozen for three months.
Final Thoughts
These Mini Lemon Cheesecake Tarts are not only delightful but also versatile. You can customize them with various toppings like fresh berries or chocolate drizzle. Perfect for gatherings or just a cozy treat at home, they are sure to impress your family and friends!
Did You Enjoy Making This Recipe? Please rate this recipe with ⭐⭐⭐⭐⭐ or leave a comment.
📖 Recipe Card
Print
Mini Lemon Cheesecake Tarts
- Total Time: 20 minutes
- Yield: Makes approximately 12 mini tarts 1x
Description
Indulge in the bright and zesty flavors of Mini Lemon Cheesecake Tarts, a delightful no-bake dessert that is perfect for any occasion. These charming treats combine a creamy lemon filling with a buttery graham cracker crust, making them an irresistible addition to parties, picnics, or casual get-togethers. With just 20 minutes of prep time, you can easily whip up these delightful bites without the hassle of baking. Plus, they can be topped with your favorite fruits or preserves for a personalized twist. Impress your guests and satisfy your sweet tooth with these refreshing mini cheesecakes that balance sweetness with a citrus kick.
Ingredients
- 1 cup graham cracker crumbs
- 2 tablespoons granulated sugar
- 6 tablespoons unsalted butter, melted
- 1 8-oz package cream cheese, softened
- 1/2 cup sugar
- 2 teaspoons lemon zest, divided
- 2 tablespoons lemon juice, freshly squeezed
- 1/3 cup heavy whipping cream
- 1/4 teaspoon vanilla extract
- fresh fruit or fruit preserves for garnish
Instructions
- Combine graham cracker crumbs, sugar, and melted butter in a bowl. Press into muffin tins to form the crust.
- Beat softened cream cheese until smooth; add sugar, lemon zest, lemon juice, and vanilla. Mix well.
- Whip heavy cream until stiff peaks form and fold into the cream cheese mixture.
- Spoon filling into crusts and refrigerate for at least 2 hours to set.
- Garnish with fresh fruit or preserves before serving.
- Prep Time: 20 minutes
- Cook Time: 0 minutes
- Category: Dessert
- Method: No-Bake
- Cuisine: American
Nutrition
- Serving Size: 1 tart (45g)
- Calories: 180
- Sugar: 12g
- Sodium: 200mg
- Fat: 12g
- Saturated Fat: 7g
- Unsaturated Fat: 4g
- Trans Fat: 0g
- Carbohydrates: 16g
- Fiber: 1g
- Protein: 2g
- Cholesterol: 30mg


