Classic Chocolate Snowball Cookies are a delightful treat that brings a rich, chocolatey flavor to any occasion. These cookies are perfect for holiday gatherings, cozy family get-togethers, or simply indulging in a sweet snack. Their unique snowball shape and powdered sugar coating make them visually appealing, while the combination of buttery dough and chocolate creates an irresistible taste that everyone will love.

Jump to:
- Why You’ll Love This Recipe
- Tools and Preparation
- Essential Tools and Equipment
- Importance of Each Tool
- Ingredients
- For the Cookies
- How to Make Classic Chocolate Snowball Cookies
- Step 1: Preheat the Oven
- Step 2: Cream the Butter and Sugar
- Step 3: Mix the Dry Ingredients
- Step 4: Fold in the Nuts and Chocolate Chips
- Step 5: Shape the Cookies
- Step 6: Bake
- Step 7: Roll in Sugar
- How to Serve Classic Chocolate Snowball Cookies
- With a Hot Beverage
- As Part of a Dessert Platter
- Gift Presentation
- How to Perfect Classic Chocolate Snowball Cookies
- Best Side Dishes for Classic Chocolate Snowball Cookies
- Common Mistakes to Avoid
- Storage & Reheating Instructions
- Refrigerator Storage
- Freezing Classic Chocolate Snowball Cookies
- Reheating Classic Chocolate Snowball Cookies
- Frequently Asked Questions
- Can I use margarine instead of butter?
- What can I substitute for nuts in Classic Chocolate Snowball Cookies?
- How do I achieve a more chocolatey flavor?
- How long do these cookies last?
- Final Thoughts
- 📖 Recipe Card
Why You’ll Love This Recipe
- Easy to Make: With simple ingredients and straightforward steps, you can whip up these cookies quickly, even if you’re a beginner.
- Perfect for Any Occasion: Whether it’s Christmas, birthdays, or just because, these cookies fit right in at any event.
- Versatile Flavor: Feel free to customize your cookies by adding nuts or mini chocolate chips for extra texture and flavor.
- Freeze for Later: These cookies freeze well, so you can prepare them ahead of time and enjoy them whenever you like.
- Crowd-Pleaser: Their delicious taste and beautiful appearance make them an instant hit among friends and family.
Tools and Preparation
Before diving into the baking process, gather your tools to ensure a smooth experience. Having the right equipment will help you achieve the best results for your Classic Chocolate Snowball Cookies.
Grab This Chef Knife Now - Almost Gone!
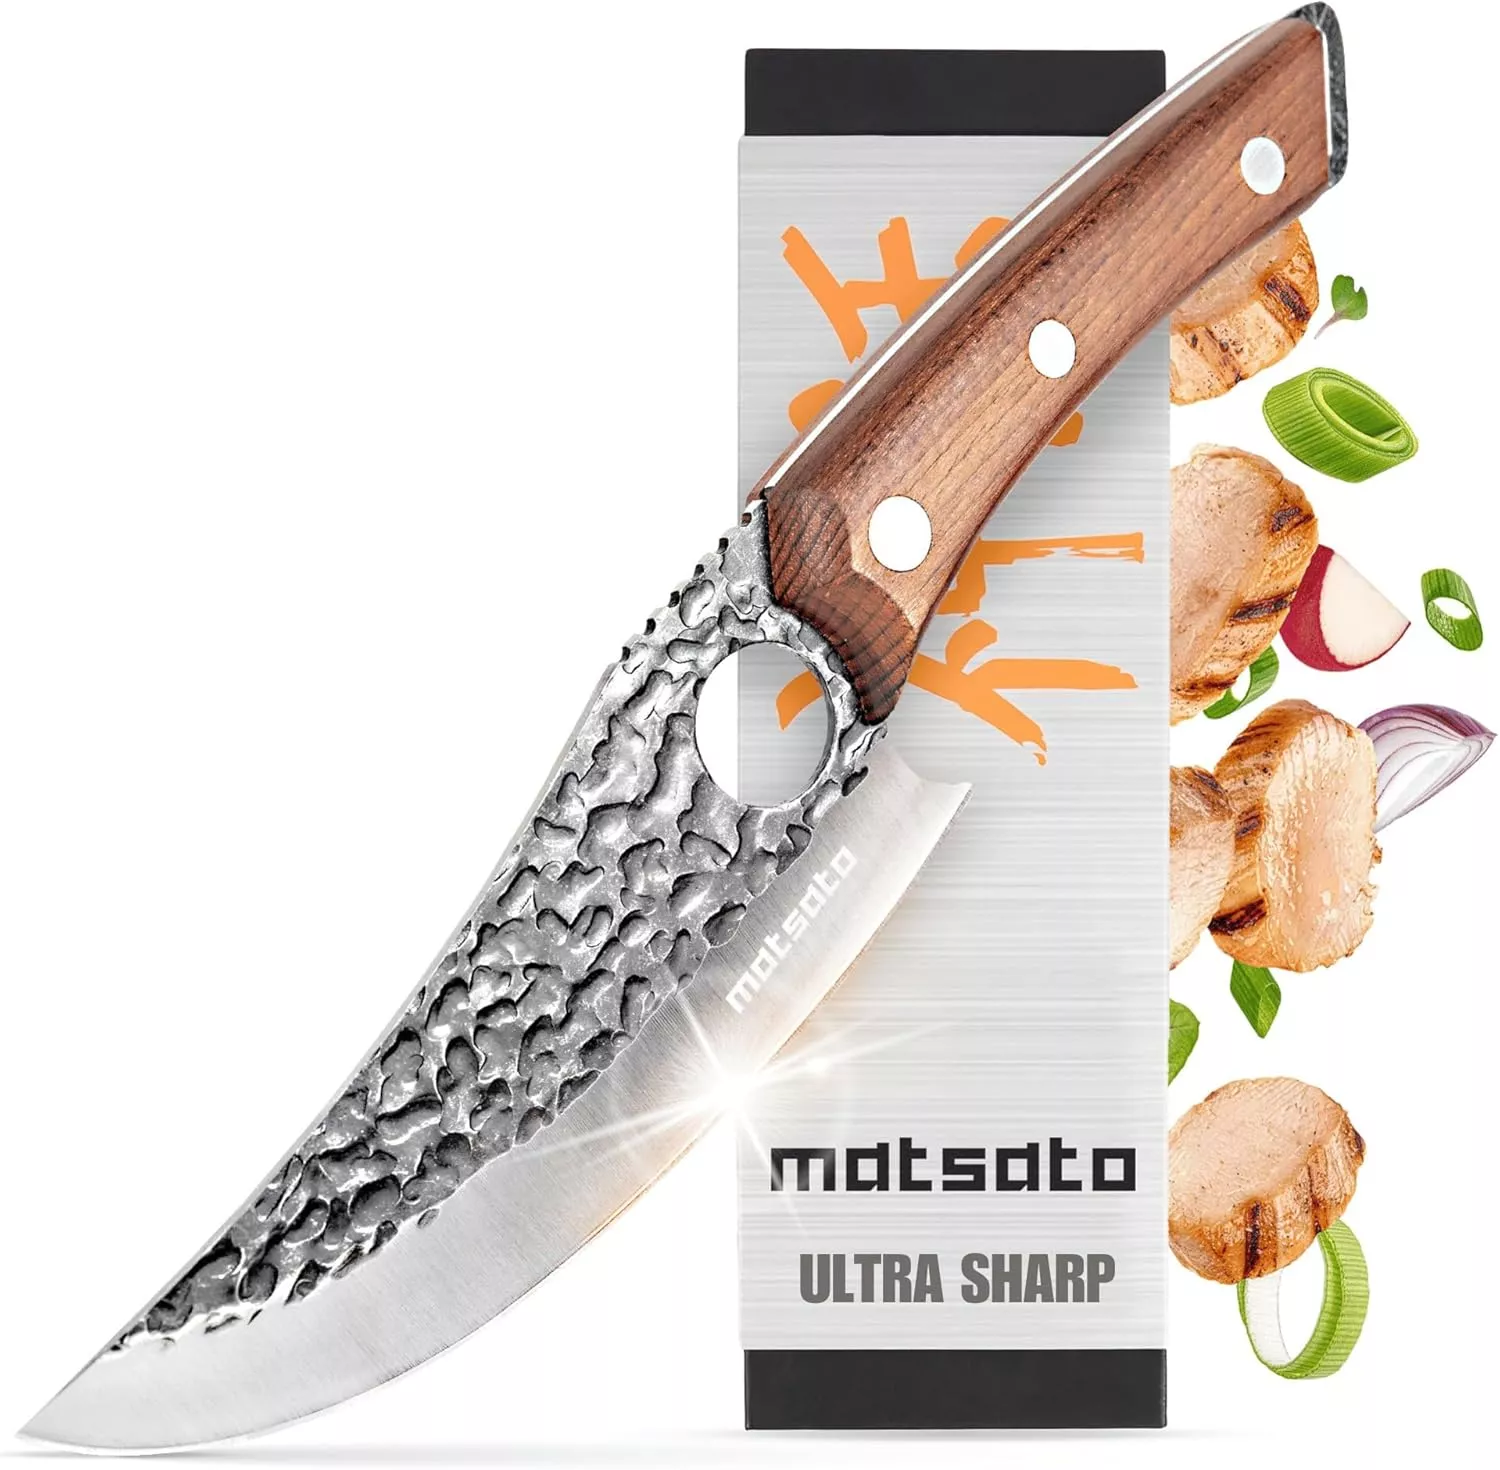
- Stays Razor-Sharp: Ice-hardened blade keeps its edge longer than ordinary knives
- Superior Grip Control: Unique finger hole design gives you perfect balance and safety
- Built to Last a Lifetime: Premium stainless steel blade with elegant beech wood handle
Customer Reviews ★★★★★
Essential Tools and Equipment
- Stand mixer or hand mixer
- Mixing bowls
- Whisk
- Baking sheets
- Parchment paper or silicone baking mats
- Wire rack
Importance of Each Tool
- Stand mixer or hand mixer: Essential for creaming butter and sugar together to create a light and fluffy texture.
- Mixing bowls: Necessary for separating wet and dry ingredients to ensure proper mixing.
- Baking sheets: Provide a sturdy surface for cookie baking; lined with parchment paper ensures easy removal.
Ingredients
For the Cookies
- 1 cup (2 sticks) unsalted butter, softened – Try Kerrygold Butter for premium flavor and texture.
- 1/2 cup powdered sugar (plus extra for rolling) – Domino Confectioners’ Sugar is my go-to for smooth coatings.
- 1 teaspoon vanilla extract
- 1 3/4 cups all-purpose flour – King Arthur Flour delivers consistent, high-quality results.
- 1/4 cup unsweetened cocoa powder – Ghirardelli Premium Cocoa Powder is perfect for rich chocolate notes.
- 1/2 teaspoon salt
- 1 cup finely chopped pecans or walnuts (optional)
- 1/2 cup mini chocolate chips (optional)
How to Make Classic Chocolate Snowball Cookies
Step 1: Preheat the Oven
Set your oven to 350°F (175°C). Line two baking sheets with parchment paper or silicone baking mats for easy cleanup.
Step 2: Cream the Butter and Sugar
In a large mixing bowl, use a stand mixer or hand mixer to beat the softened butter and powdered sugar until light and fluffy. Add the vanilla extract and mix until combined.
Step 3: Mix the Dry Ingredients
In a separate bowl, whisk together the flour, cocoa powder, and salt. Gradually add the dry ingredients to the butter mixture, mixing just until combined.
Step 4: Fold in the Nuts and Chocolate Chips
Stir in the finely chopped nuts and mini chocolate chips (if using) until evenly distributed throughout the dough.
Step 5: Shape the Cookies
Scoop out about a tablespoon of dough and roll it into a ball. Place the dough balls onto the prepared baking sheets, spacing them about an inch apart.
Step 6: Bake
Bake the cookies in the preheated oven for 12-15 minutes, or until the edges are set and the bottoms are lightly browned. Be careful not to overbake; these cookies should remain soft and tender inside.
Step 7: Roll in Sugar
Allow the cookies to cool slightly on the baking sheet for about 5 minutes. While still warm, roll each cookie in a generous amount of powdered sugar, ensuring they’re fully coated. Place the cookies on a wire rack to cool completely. Once cooled, give them one more roll in powdered sugar for that classic snowball look.
With these simple steps, you’ll have delicious Classic Chocolate Snowball Cookies ready to share with friends and family!
How to Serve Classic Chocolate Snowball Cookies
Classic Chocolate Snowball Cookies are delightful treats that can be enjoyed in a variety of ways. Whether you’re hosting a festive gathering or simply indulging at home, these cookies bring joy to any occasion.
With a Hot Beverage
- Coffee: Pair these cookies with a rich cup of coffee for a comforting afternoon treat.
- Hot Chocolate: Enhance the chocolate experience by enjoying them with a warm mug of hot chocolate topped with marshmallows.
- Tea: A soothing cup of herbal tea balances the sweetness and provides a calming moment.
As Part of a Dessert Platter
- Mixed Cookies: Include these snowball cookies alongside other favorites like gingerbread or sugar cookies for an inviting dessert spread.
- Fruit Compote: Serve with a side of fresh fruit compote for a refreshing contrast to the rich chocolate flavors.
- Ice Cream: Top vanilla ice cream with crumbled snowball cookies for an indulgent dessert.
Gift Presentation
- Holiday Boxes: Package the cookies in festive boxes as thoughtful gifts for friends and family during the holiday season.
- Cookie Jars: Fill a clear jar with these cookies and tie it with a ribbon for an attractive homemade gift.

How to Perfect Classic Chocolate Snowball Cookies
Perfecting Classic Chocolate Snowball Cookies is easy with a few simple tips. Follow these guidelines to ensure your cookies turn out delicious every time.
- Use Softened Butter: Ensure your butter is at room temperature for optimal creaming with sugar, resulting in light and fluffy dough.
- Measure Flour Accurately: Use the spoon-and-level method to avoid dense cookies caused by too much flour.
- Don’t Overmix the Dough: Mix just until combined to keep the texture tender; overmixing can lead to tough cookies.
- Chill the Dough (Optional): For slightly firmer cookies, chill the dough for 30 minutes before baking, which helps maintain shape while baking.
- Watch Baking Time: Keep an eye on your cookies as they bake; removing them when they are slightly underdone will give you that soft center.
- Double Roll in Powdered Sugar: For that classic snowball appearance, roll the warm cookies in powdered sugar, let them cool, then roll again for extra sweetness.
Best Side Dishes for Classic Chocolate Snowball Cookies
When serving Classic Chocolate Snowball Cookies, consider pairing them with complementary side dishes that enhance their flavor. Here are some delightful options:
- Fruit Salad: A mix of seasonal fruits adds freshness and balances the sweetness of the cookies.
- Cheese Platter: Include various cheeses like brie or goat cheese to create a savory contrast with the sweet cookies.
- Chocolate Fondue: Dip the cookies into warm chocolate fondue for an extra decadent treat.
- Caramel Sauce: Drizzle caramel sauce over the plate for added richness and flavor depth.
- Yogurt Parfait: Layer yogurt with granola and berries next to your cookie platter for a healthy touch.
- Milkshake: Serve alongside chocolate or vanilla milkshakes for a nostalgic combination that delights both kids and adults.
Common Mistakes to Avoid
Making Classic Chocolate Snowball Cookies is a delightful experience, but small mistakes can lead to less-than-perfect results. Here are some common pitfalls to watch out for:
- Skipping the Butter Softening Step: Always make sure your butter is softened. Hard butter doesn’t cream well with sugar, affecting the cookie’s texture.
- Overmixing the Dough: Mix the dough just until combined. Overmixing can lead to tough cookies instead of tender ones.
- Not Measuring Flour Correctly: Use the spoon-and-level method to measure flour accurately. Too much flour makes cookies dry and crumbly.
- Ignoring Baking Time: Keep an eye on your cookies while they bake. Overbaking can result in hard cookies rather than soft and chewy ones.
- Rolling in Sugar Too Early: Allow cookies to cool slightly before rolling them in powdered sugar. This helps the sugar stick better for that classic snowball look.

Storage & Reheating Instructions
Refrigerator Storage
- Store in an airtight container for up to 1 week.
- Layer cookies with parchment paper to prevent sticking.
Freezing Classic Chocolate Snowball Cookies
- Freeze for up to 3 months in a freezer-safe container.
- Place parchment paper between layers to keep them separate.
Reheating Classic Chocolate Snowball Cookies
- Oven: Preheat to 300°F (150°C) and warm for about 5-7 minutes.
- Microwave: Heat one cookie at a time for about 10-15 seconds.
- Stovetop: Use a non-stick skillet over low heat for about 2-3 minutes, flipping halfway.
Frequently Asked Questions
Here are some commonly asked questions about Classic Chocolate Snowball Cookies.
Can I use margarine instead of butter?
Using margarine may alter the flavor and texture of your cookies. It’s best to stick with unsalted butter for optimal taste.
What can I substitute for nuts in Classic Chocolate Snowball Cookies?
You can omit nuts entirely or replace them with additional mini chocolate chips or dried fruit if you prefer a nut-free version.
How do I achieve a more chocolatey flavor?
To enhance chocolate flavor, try using dark cocoa powder or adding extra mini chocolate chips into the dough.
How long do these cookies last?
Classic Chocolate Snowball Cookies last about one week in an airtight container at room temperature or up to three months if frozen.
Final Thoughts
Classic Chocolate Snowball Cookies are not only delicious but also versatile. You can easily customize them by adding different nuts or chocolate varieties. These cookies are perfect for any occasion, from holiday gatherings to cozy family nights. Give this recipe a try, and enjoy the heavenly taste of these delightful treats!
Did You Enjoy Making This Recipe? Please rate this recipe with ⭐⭐⭐⭐⭐ or leave a comment.
📖 Recipe Card
Print
Classic Chocolate Snowball Cookies
- Total Time: 30 minutes
- Yield: Approximately 24 cookies 1x
Description
Classic Chocolate Snowball Cookies are a must-try treat that brings joy to any occasion. These soft, buttery cookies are infused with rich cocoa and rolled in powdered sugar for a delightful finish. Their unique snowball shape not only makes them visually appealing but also adds to the fun of indulging in these sweet bites. Perfect for holiday gatherings, cozy family nights, or as a thoughtful gift, these cookies are sure to impress everyone at your table. With easy-to-follow instructions and customizable options, you can whip up a batch in no time and enjoy their melt-in-your-mouth texture.
Ingredients
- 1 cup unsalted butter, softened
- 1/2 cup powdered sugar (plus extra for rolling)
- 1 teaspoon vanilla extract
- 1 3/4 cups all-purpose flour
- 1/4 cup unsweetened cocoa powder
- 1/2 teaspoon salt
- Optional: 1 cup chopped nuts or 1/2 cup mini chocolate chips
Instructions
- Preheat oven to 350°F (175°C) and line baking sheets with parchment paper.
- In a mixing bowl, cream together softened butter and powdered sugar until fluffy. Add vanilla extract and mix well.
- In another bowl, whisk together flour, cocoa powder, and salt; gradually add to the butter mixture until just combined.
- If using, stir in chopped nuts or mini chocolate chips.
- Scoop tablespoon-sized dough portions and roll into balls; place on prepared baking sheets about an inch apart.
- Bake for 12-15 minutes until edges are set; do not overbake.
- Cool slightly before rolling in powdered sugar; allow to cool completely on a wire rack.
- Prep Time: 15 minutes
- Cook Time: 15 minutes
- Category: Dessert
- Method: Baking
- Cuisine: American
Nutrition
- Serving Size: 1 cookie (18g)
- Calories: 90
- Sugar: 3g
- Sodium: 50mg
- Fat: 6g
- Saturated Fat: 4g
- Unsaturated Fat: 2g
- Trans Fat: 0g
- Carbohydrates: 10g
- Fiber: <1g
- Protein: <1g
- Cholesterol: 15mg